Home
ホーム
 Members
メンバー紹介
Newsニュース&お知らせ
FAQsよくある質問
Projects作品
Reportsリポート
Game IdeasゲームルールPDF
Contactメール
Login Pageメンバー専用
Kumamoto Gamers
熊本のミニチュアゲーム会

The Dungeon ザ・ダンジョン - Our Wargaming Room
by David on 2016-11-09 (Wed) 17:17PM
Just for nostalgia's sake, I thought I'd post a photo journal of the loft games room as it progresses from the empty space above the house into a purpose-built gaming room. I'll add photos as and when major stages are completed, so you can see the whole project take shape.
The Dream...
Here are two digital images of how the loft should look, once it's finally finished. This was made in interior design software, and then doctored to give it the low sloping ceiling and stonework walls. The finished games room should have the following cool stuff:
-
Wooden planking for the 'top' half of the room.
-
Paving stone-effect carpet tiling for the rest of the games room, so we don't get cold toes!
-
Stone-effect castle walls on all sides, textured out of styrofoam.
-
Fake fireplace, just to give it a castley-feel!
-
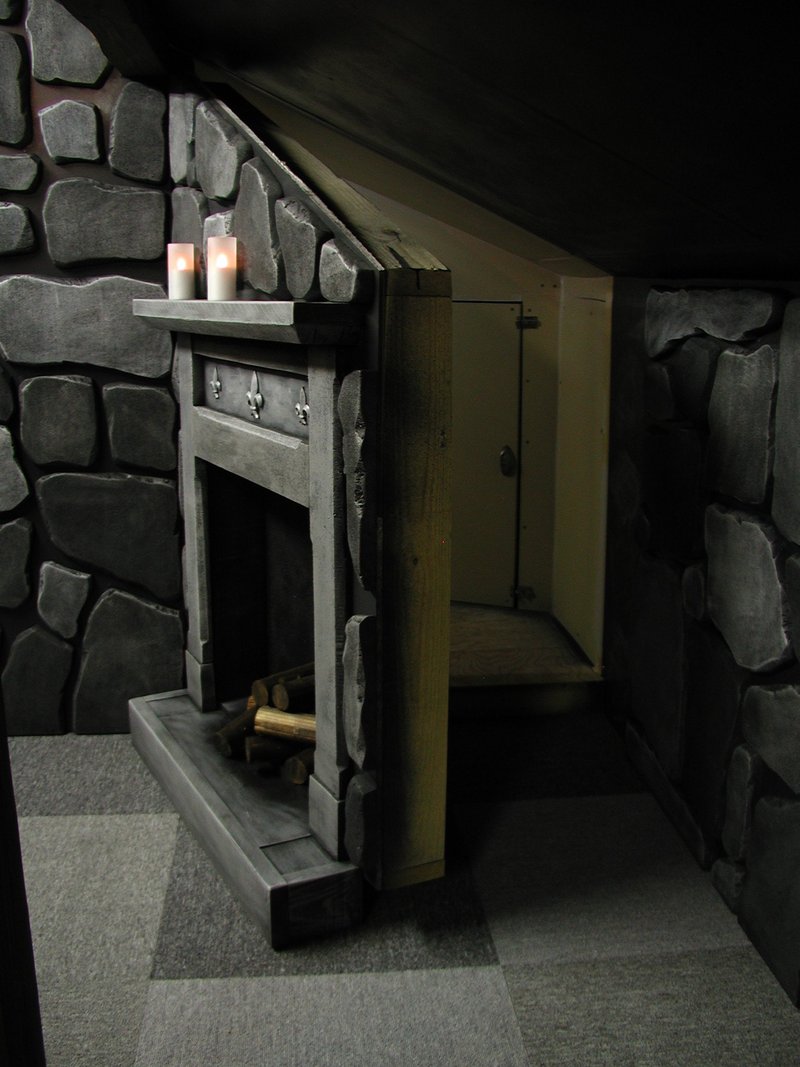
Hidden storage room concealed behind (yes, you've guessed it) the fake fireplace, which swings out on hinges.
-
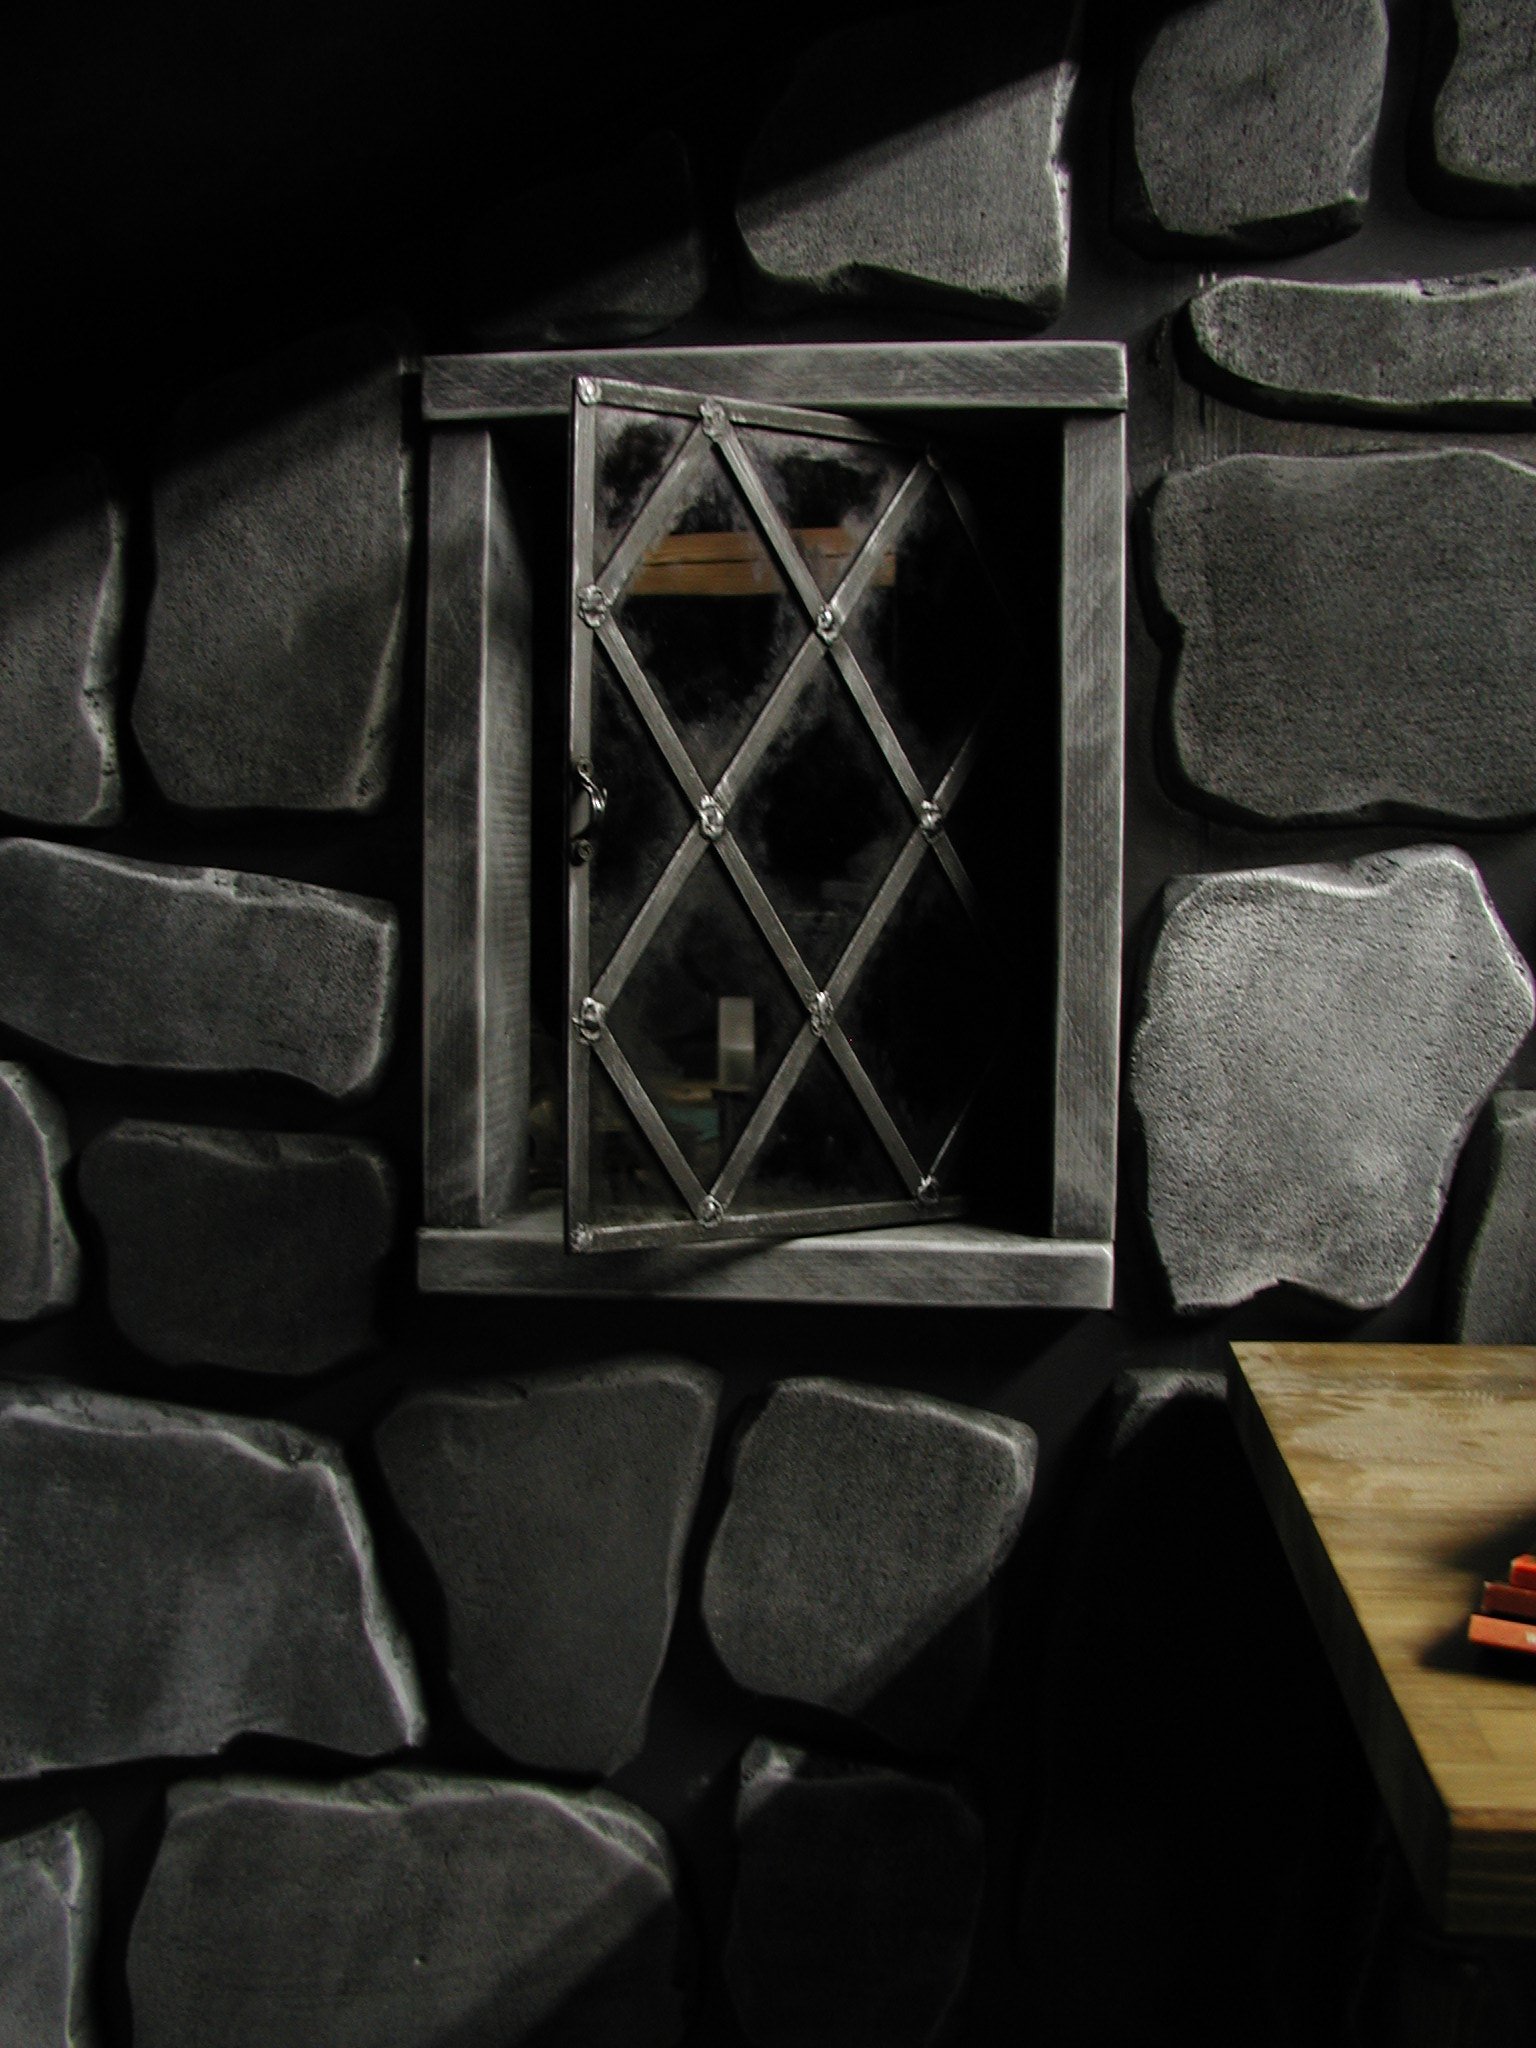
Leaded glass window, to give a feel of being inside, as opposed to outside, a castle.
-
Medieval wooden wagon-wheel light over the table.
-
Purpose built gaming table, with concealed storage space for three gaming boards. When not in use, the boards can be tucked away underneath the wooden tabletop.
-
Leather-topped bench stools, which hopefully should be sectional/movable if needed.
-
Lots of bookcases for displaying our models and armies.
-
Painting desk.
-
...and a few cool accessories - swords, beer barrels, chests, etc.


The Reality...
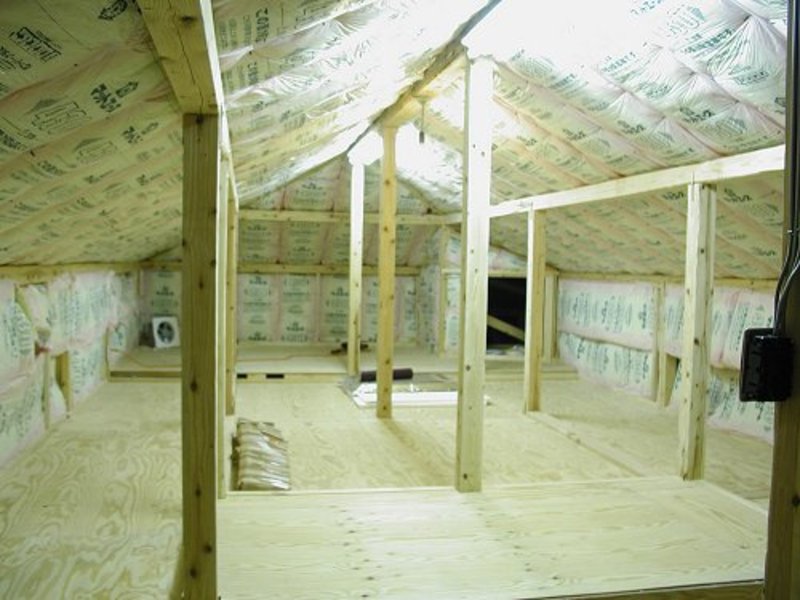
How it all started (November 2006)
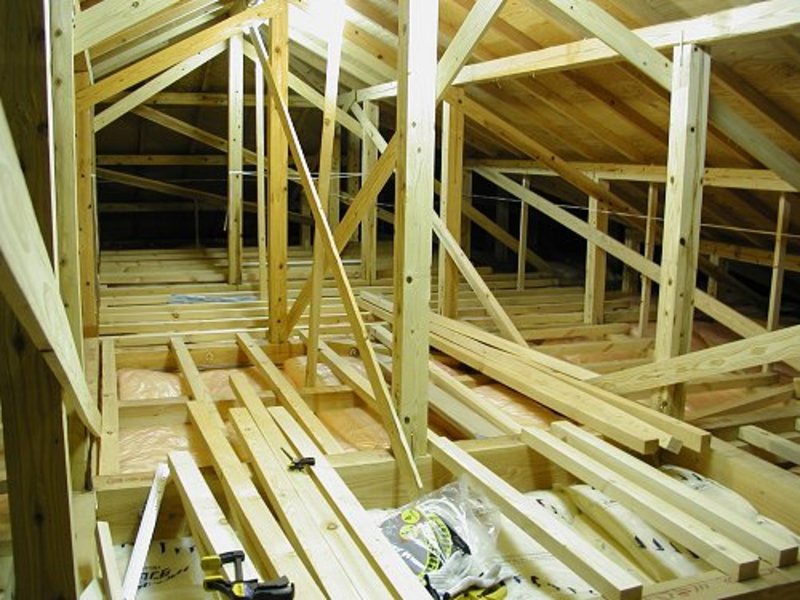
▲ This is what the loft space looked like the year we moved in, without any walls, floors or ceilings. Cool, huh? When I was planning the house originally, I decided it was the ideal space to add some storage. And all I had to do was convert it properly. What a dummy!
In the photo you can see the large amount of lumber used for the floor supports (which I had to put in while the house was still being built), and the extra insulation I added. The white ribbon on the far side marks the extent of the room.
Starting the flooring (December 2006)
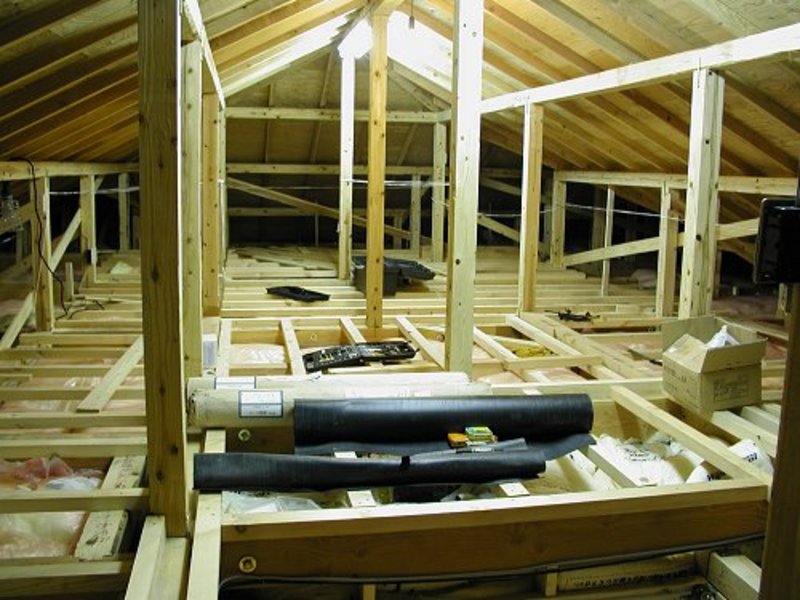
▲ In this photo you can see that the loft ladder has been installed, which made things so much easier. Imagine having to crawl through a 40cm hold every time?! Yukiko obviously had misgivings about cutting a huge hole in the ceiling of our newly-completed house, but she extended a little faith! The flooring joists have all been laid out and fixed down, and the sound insulation (the black rolls in the middle) went in shortly after that.


Floor finished (mid-December 2006)
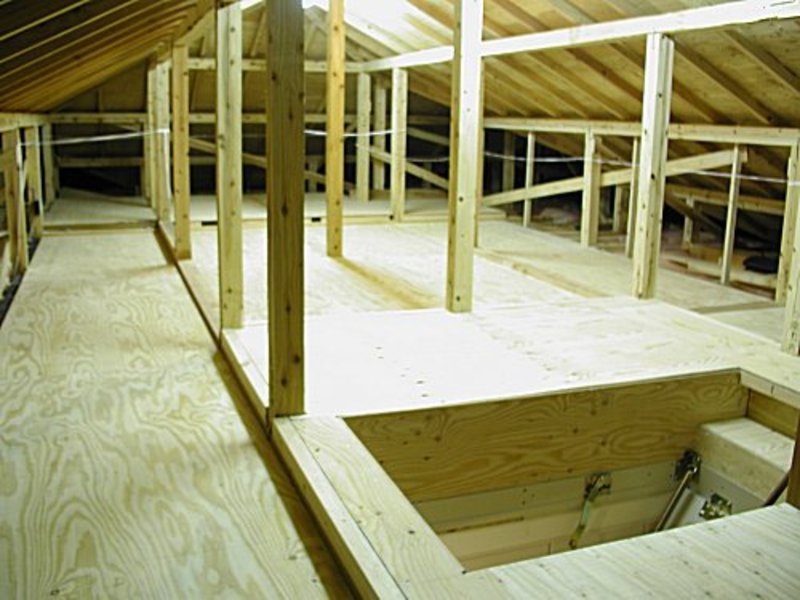
▲ Doesn't it look a whole lot better now? You can see that the floor isn't perfectly flat, so I've had to incorporate several beams and raised bits into the overall design. Hopefully once it's done most will be disguised under furniture, except for the raised bit near the camera which will become a separate area.
Ceiling insulation (Xmas 2006)
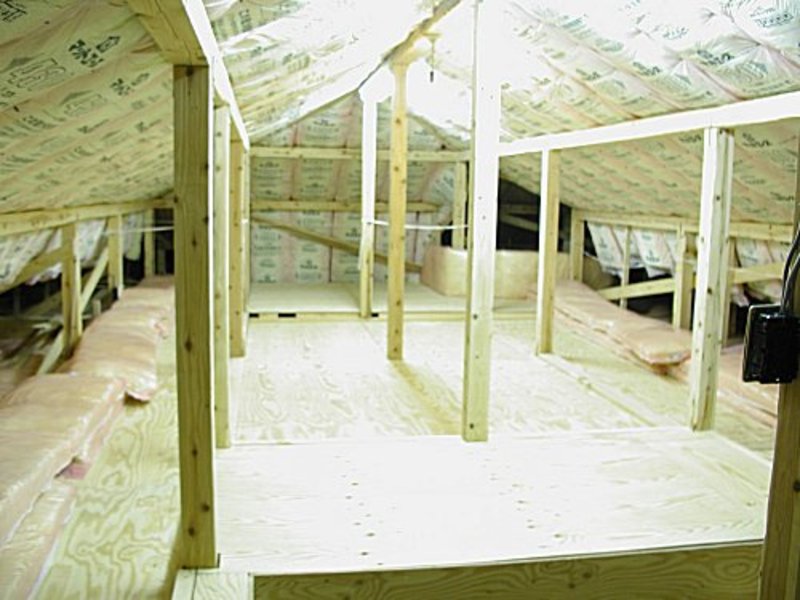
▲ I've tried to fit in as much insulation as possible into the 5cm space between ceiling and outside roof. But, as Jean-Luc can confirm, on a sunny summer's day it gets pretty toasty!
Wall insulation (Xmas 2006)
▲ Now it almost starts to look like a room, right? You can see a dark hole on the far side of the room, and that's the doorway into the rest of the roofspace, which will actually be built into the wall of the hidden storage room. Complicated huh?
Walled! (January 2007)
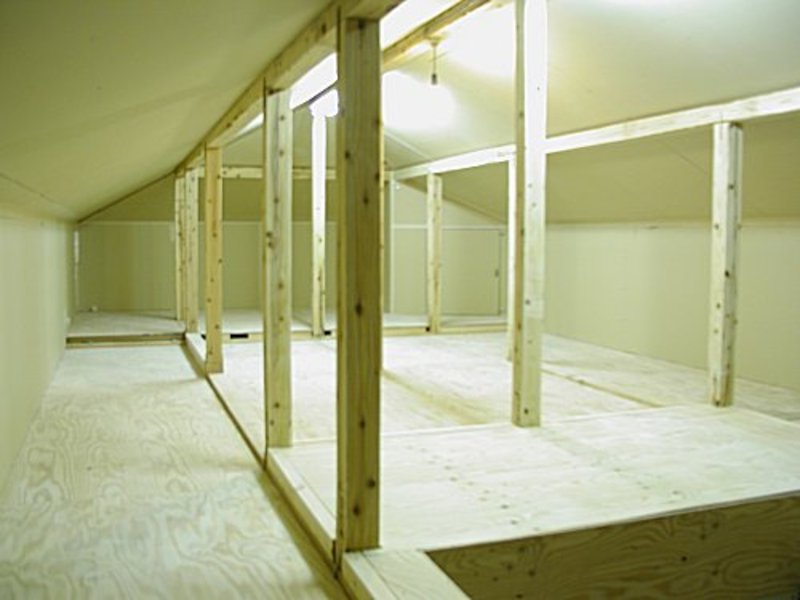

▲ We finally got there... a walled and insulated room. It looks lovely and tidy, right? Well, it's not going to stay that way for long, as the next stage is to create a partition wall at the far end, to separate the raised area from the rest of the room. Note how light and clean the room looks, and then take a look at the next photo below.
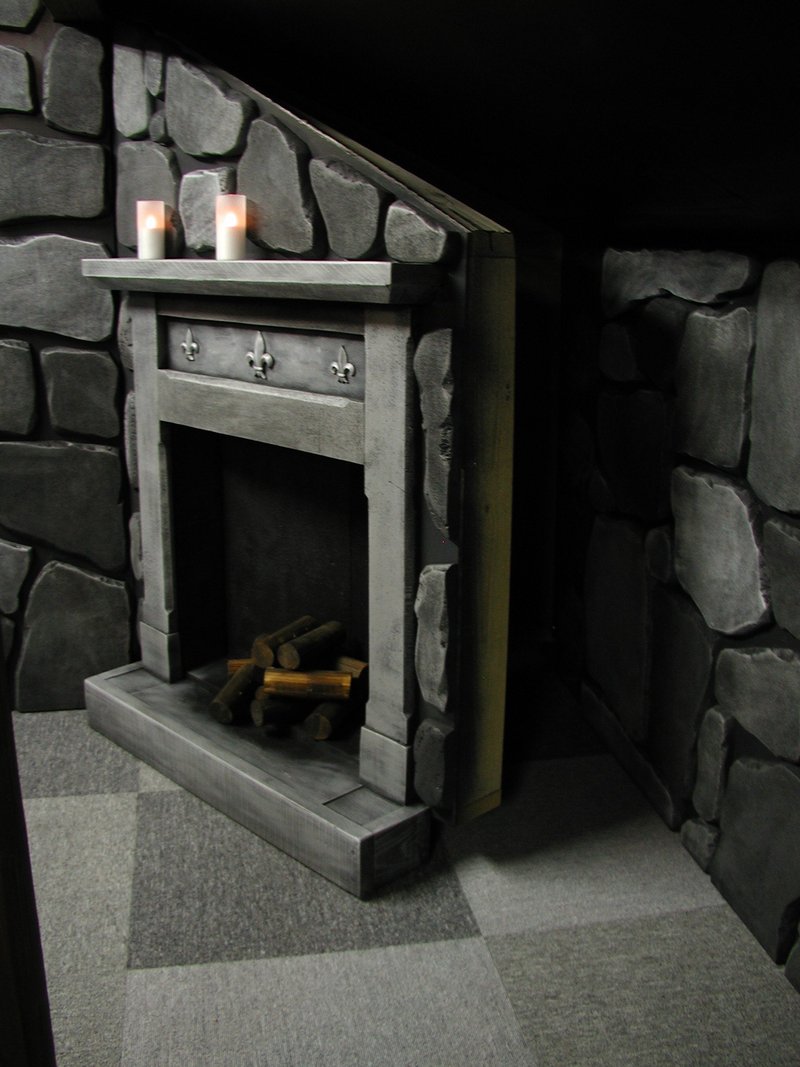
Stone walls (November 2007)
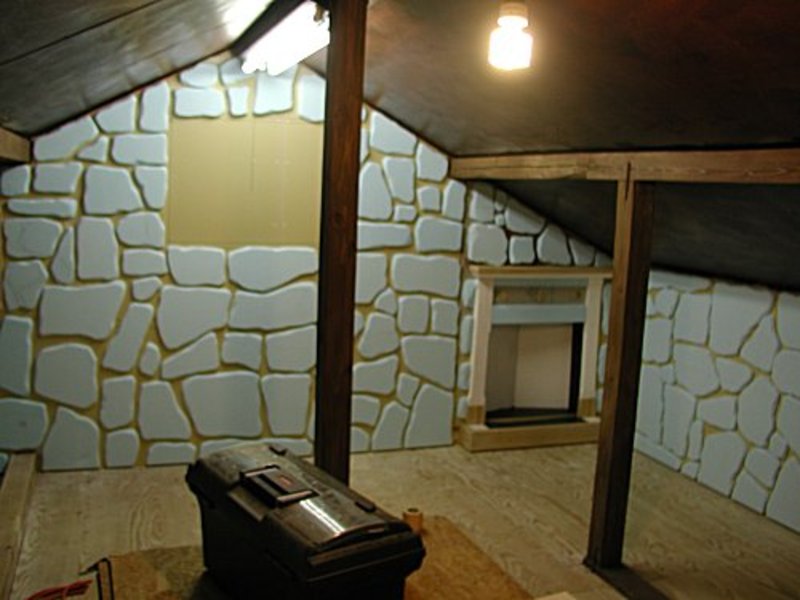
▲ I took the summer off from loft construction, as it was getting mighty toasty, and it was just about ready for some wargaming in that state anyway. So in September I splashed out on some airconditioning (seemed a waste to have room we couldn't use 4 months every year), and then started staining all the wood beams a darker brown. Next came the ceiling, which I painted a burnt-brown colour, and then messily sprayed with a lighter shade. That gave it a very odd 'bronze' effect, but was close to the 'smoke-stained pub' effect I was going for. Made the room really dark, though - and I haven't even painted the walls dark grey yet!
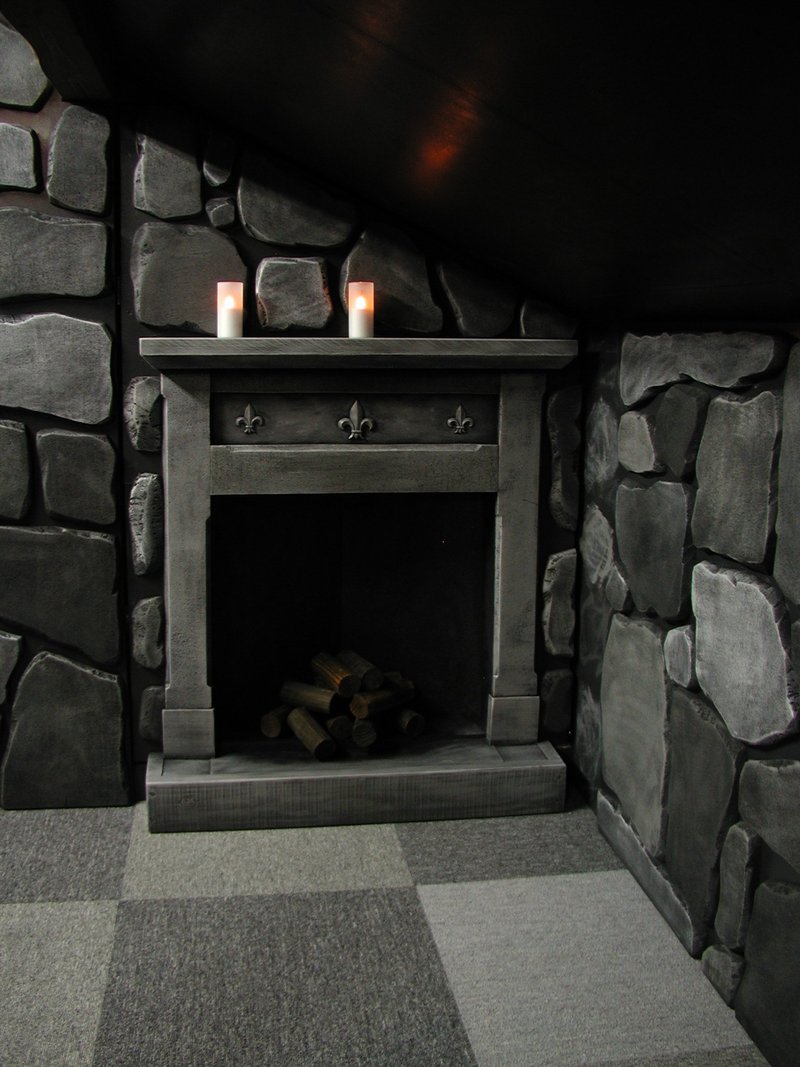
Finally at this stage it was time to cover the walls in styrofoam 'stones'. That was a real labour of love - about 30 hours it took, I think. But I was able to have some fun with the fake fireplace, which is built out of a mixture of styrofoam, polystyrene and wood. It gives it a good, chunky feel, and was topped off with some decorative fleurs-de-lis motifs. Next comes the wall spraying...
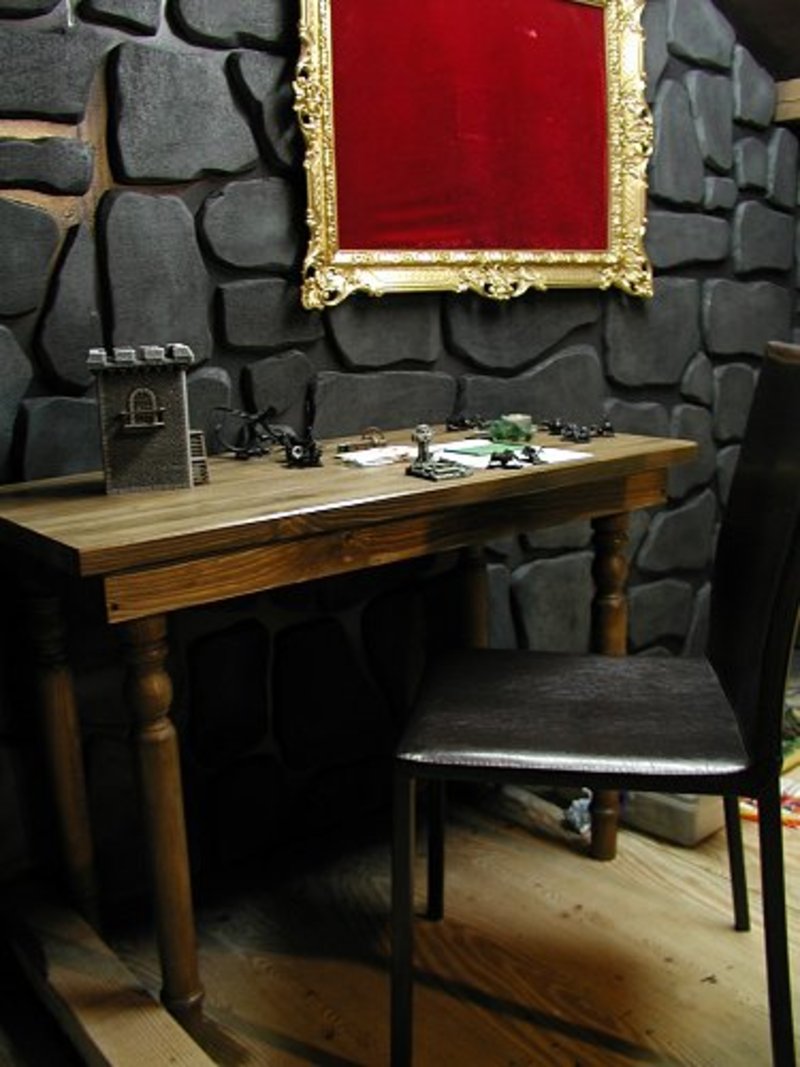
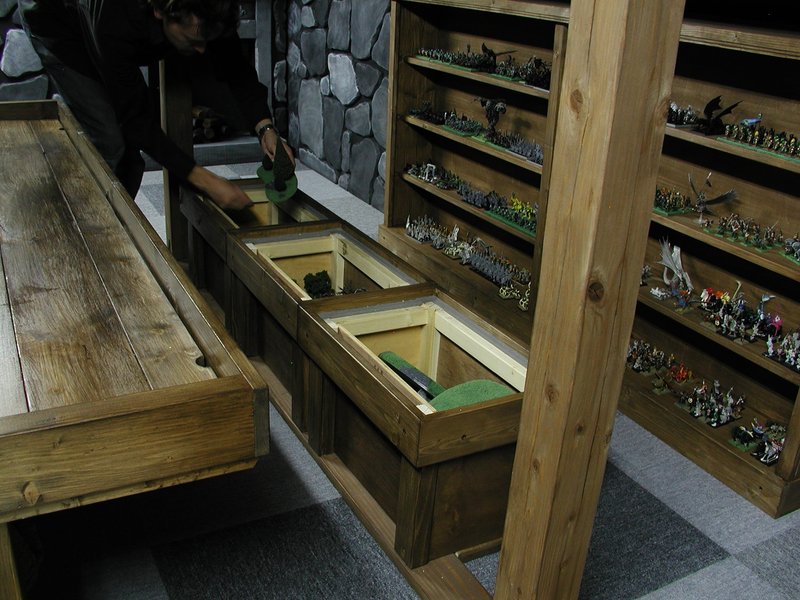
Walls primed (early December 2007)
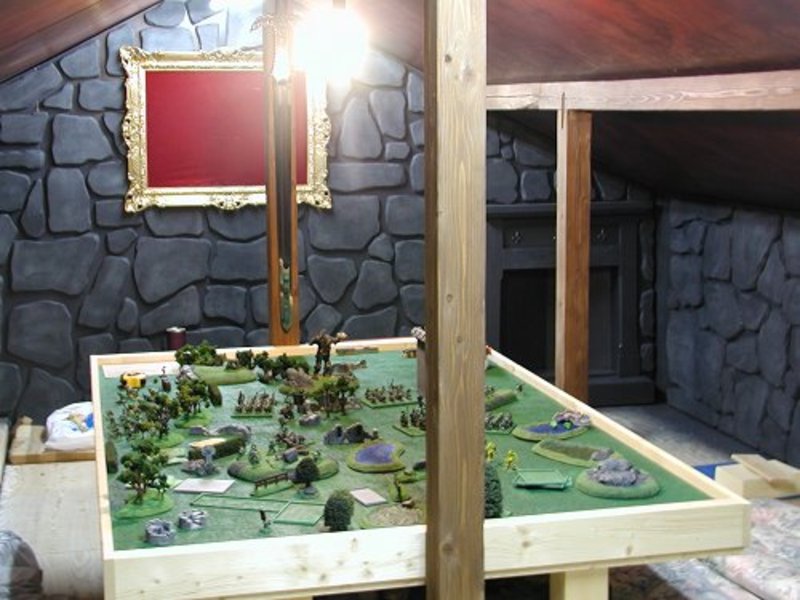

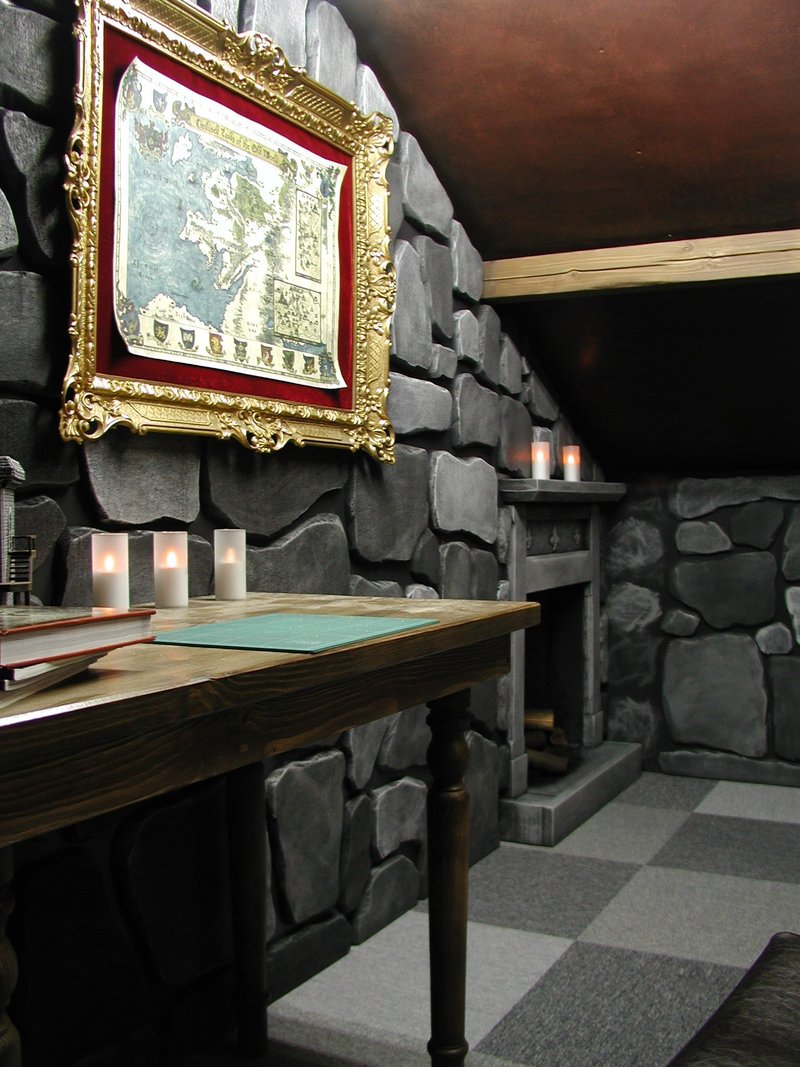
▲ Wow. That makes a big difference! A very messy afternoon with an electric spray gun and a pot of dark grey paint resulted in a really gloomy effect for the whole room (the photo above shows the room with all the extra lighting on). You can see that the fireplace blends in well - you might not even suspect it's a door?!
I've also mounted the picture frame on the wall, and my large dragon-hilted broadsword, just so you get the full effect. Need to drybrush all the stones next. Other recent changes included the completion of the gaming table, which has hidden storage for 2 gaming boards inside and also large storage for another scenic table underneath, and the flooring of the 'upper level' platform of the game room in wood planking. Next comes the seating...
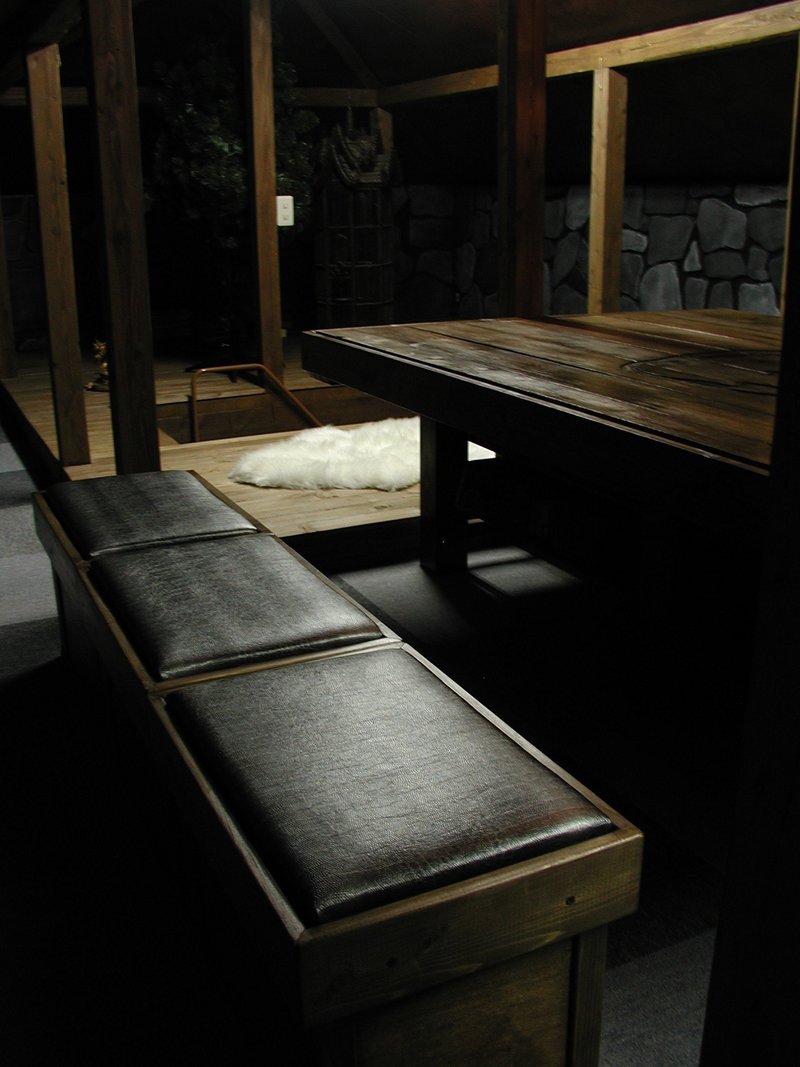
Furniture Frenzy! (mid January 2008)
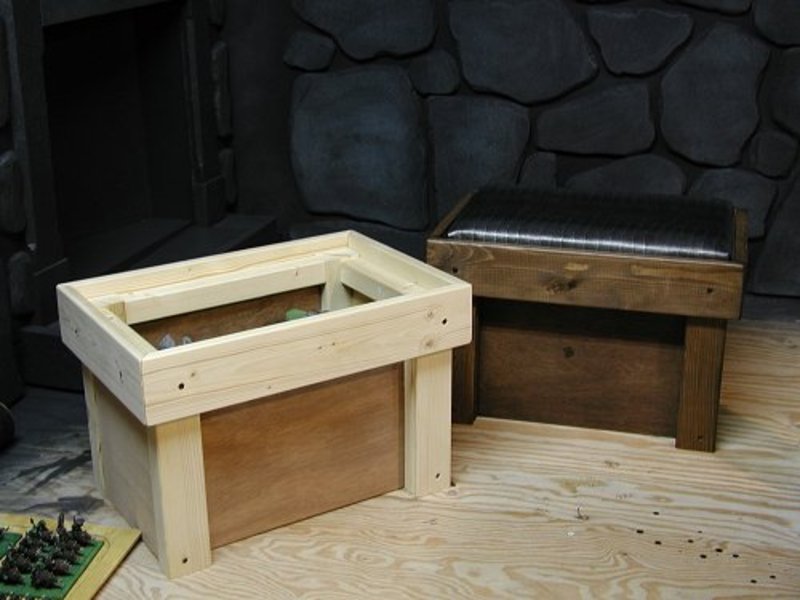
▲ This month has seen a huge lot of furniture finished, with a painting desk built to go against the tall wall. 6 sectional stools have also been finished, and stained a very dark oak colour (see the 'before' and 'after' versions, above). The inside of the stools double as storage for the mass of scenery and terrain items we've now got (Thanks, Makoto!), and they are usually lined up 3 either side of the table, to be used as long benches. I was planning to cover the seat cushions in plain black leather, but found a more interesting snakeskin material in black and dark silver - so we'll be sitting on the trophy skins of a war hydra or something, I reckon!
The only remaining bits of furniture still left to do are the large bookcases either side of the room, for displaying models. Watch this space...
Chandelier
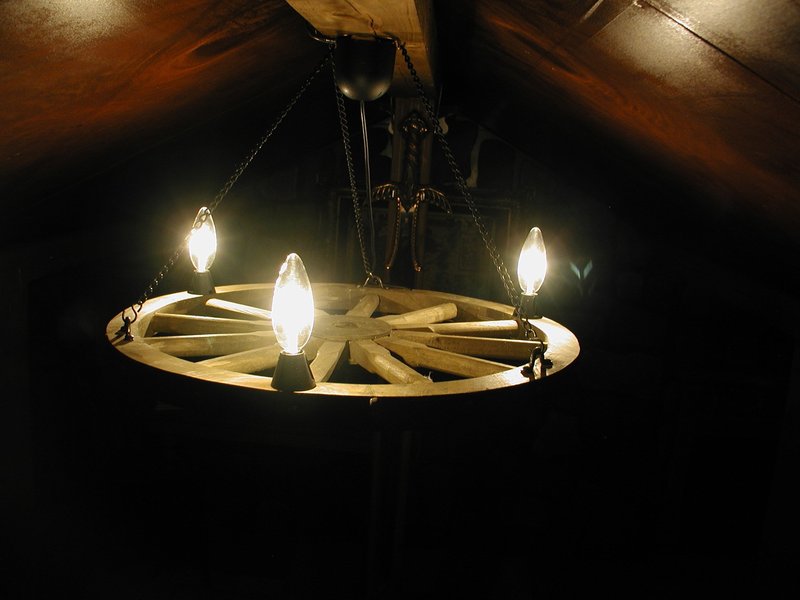
▲ After much searching on the internet, I gave up on finding a suitable chandelier for the centre of the room, and decided to make my own. Happily, I was able to cheat by starting with a really cheap wagon wheel ornament. I stripped off the surrounding metal hoop, and used the router to add a shallow groove all the way around for the cables. Then I drilled a couple of extra holes for cable runs to the bulbs, inserted the cable and screwed in some simple chandelier bulb sockets.
For atmosphere we can turn all other lights off, for a very dark feel - perfect for those Mordheim games around Halloween!
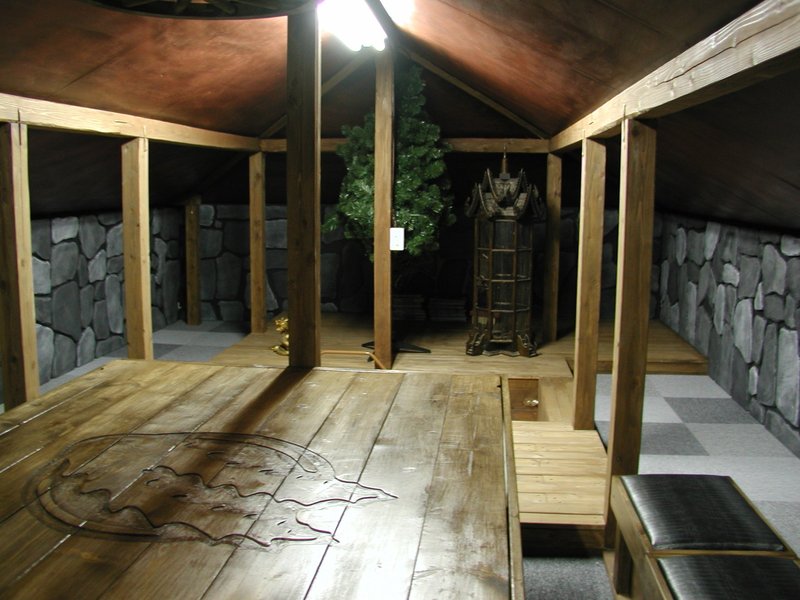
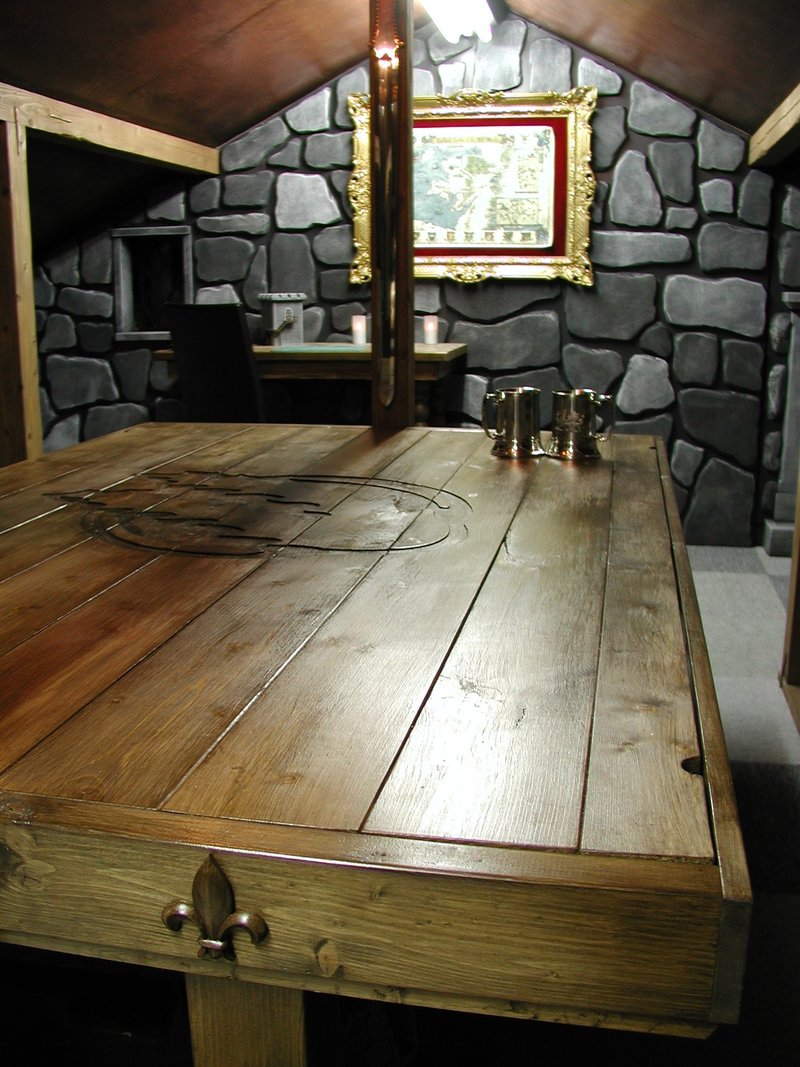
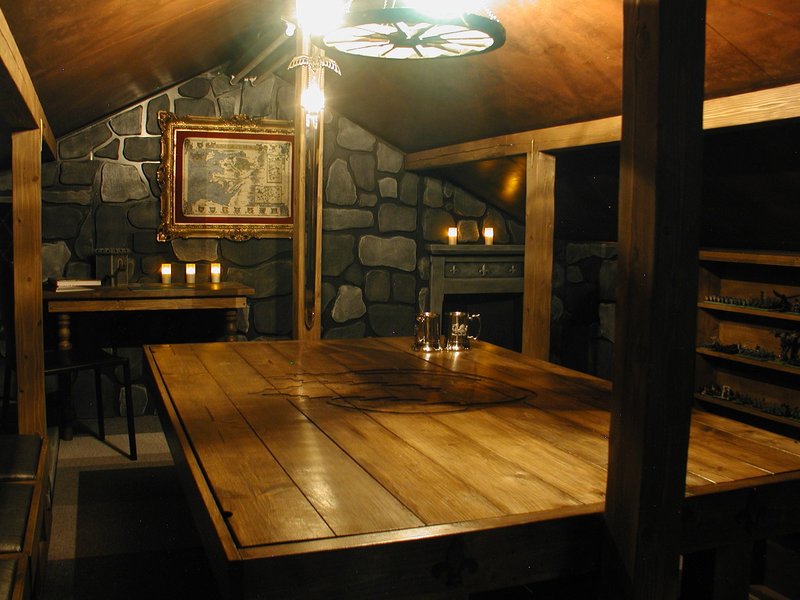
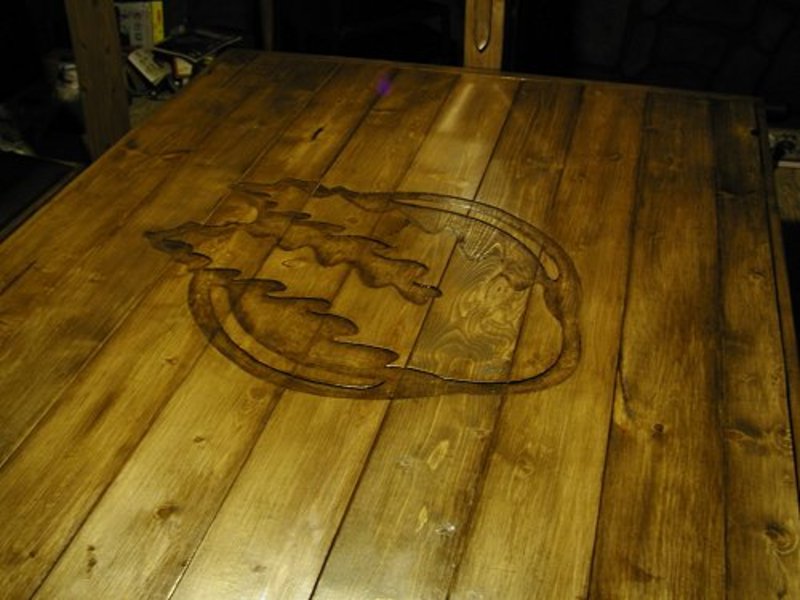
Table motif finished (mid February 2008)
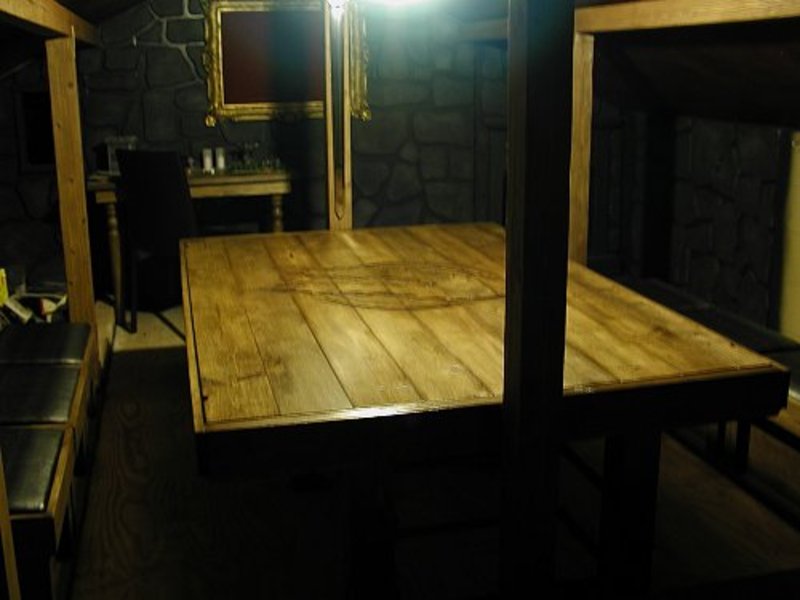

▲ After a quick poll on the clubpage, most of the voters thought a Warhammer or Sigmar's Comet would look good on the table, and the comet seemed easier! So with a router I managed to dig out the outline of the comet design on the tabletop, and then stained the whole table in various shades of brown - it looks perfect for the games room! Just the bookcases to go now...
Bookcases fitted (March 2008)
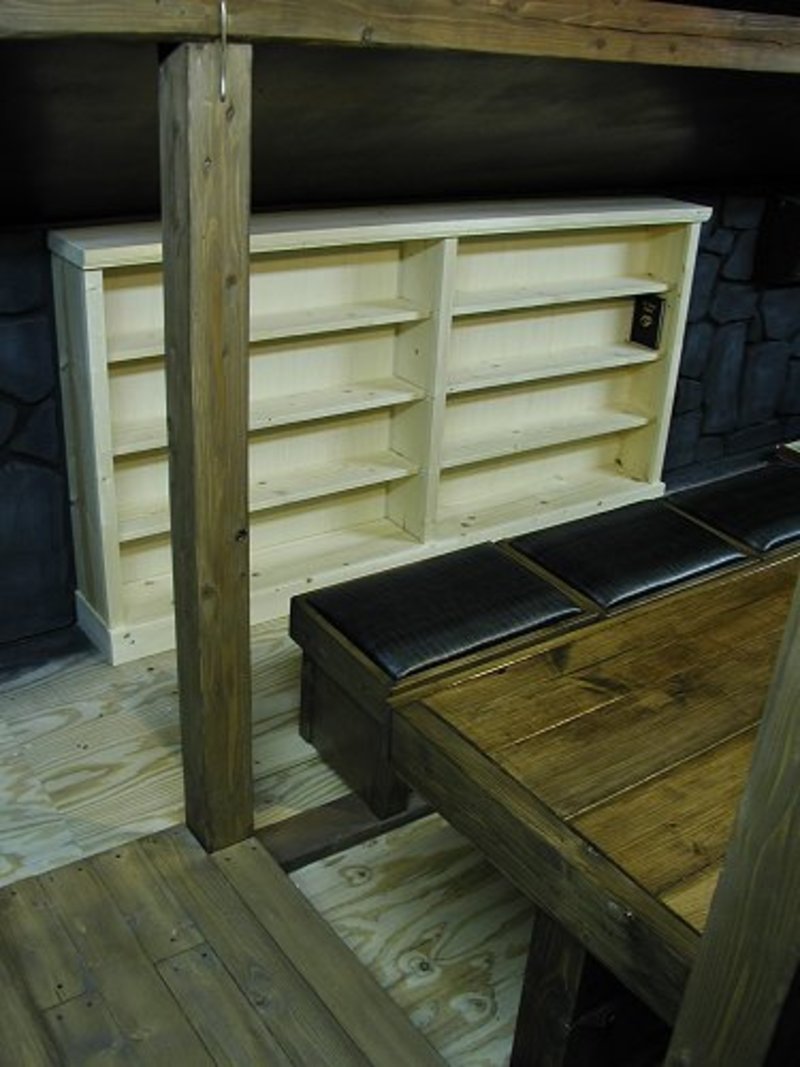
▲ We're almost there now... both the bookcases have been put together, and I'm very proud of them. In fact it seems a shame to hide them away in the loft, where nobody will really see them - oh well. There are plenty of shelves, but they're only about 6" deep, so ideal for displaying models. I'll be darkening them with woodstain over the next week, and then it's back to the walls for drybrushing (on a BIG scale) and finally carpetting. Phew!
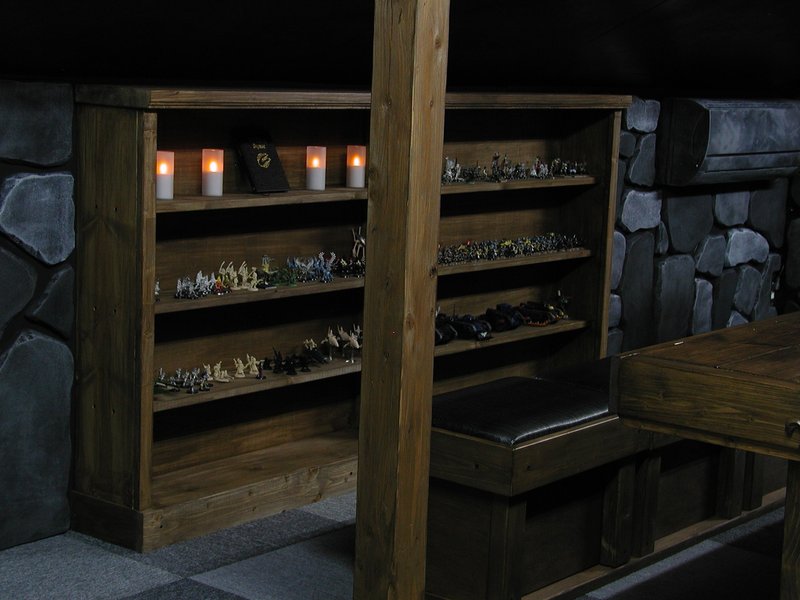
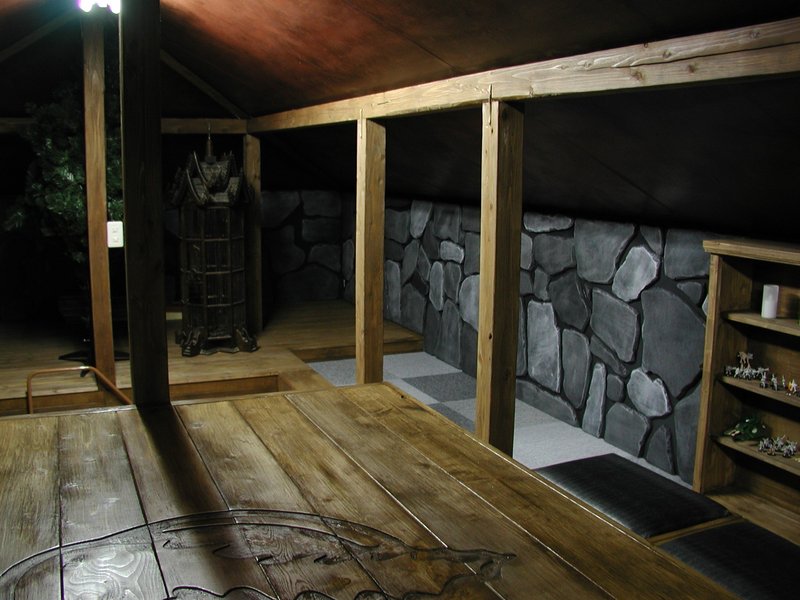
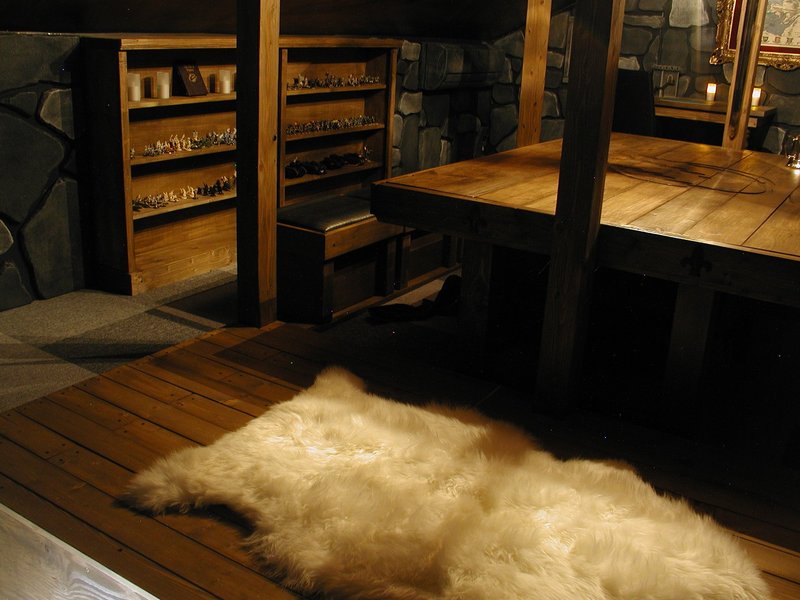
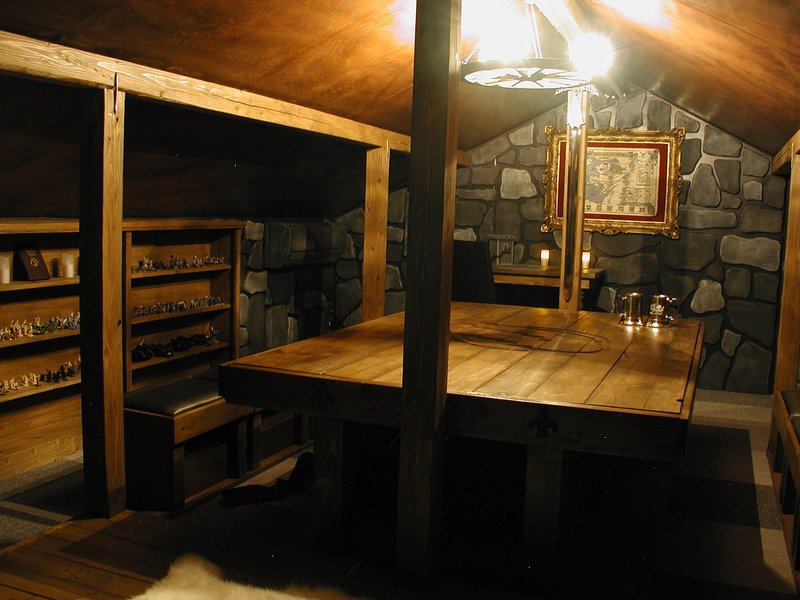
Bookcases completed and carpetting finished (May 2008)

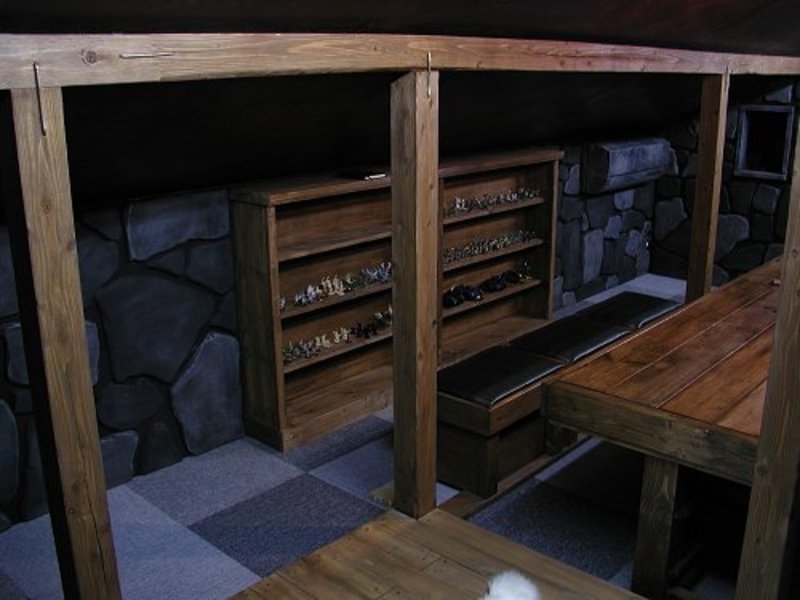

▲ As you can see from the photos above, the Dungeon room is almost complete now. The two bookcases have been stained to dark wood colours, and the shelves have been filled with (mostly unpainted!) warhammer and 40K models. I took a long 6 hours this weekend to cut and fit all of the carpet tiles, which certainly neatened up the room. The 80 carpet tiles are split between 3 different shades of grey, and a random pattern was used to produce the effect of stone paving slabs - at least that was the intention! So with the flooring completed for the entire room, I've made a start with painting the walls in grey. A very rough drybrush has been done in medium grey, and again I'm planning to create a random stone effect by using three or four shades of grey. I've even drybrushed the fireplace (top right) a lighter tone and also the airconditioner (look carefully in the left photo - can you see it?). Hopefully the wall painting should be done in a couple of weeks, and then it's final extras.... chandelier, fireplace and window!
▲On the right of this photo you can see the airconditioner unit, also painted dark grey to match the walls. What?! It's not like I'm ever going to use it anywhere else!
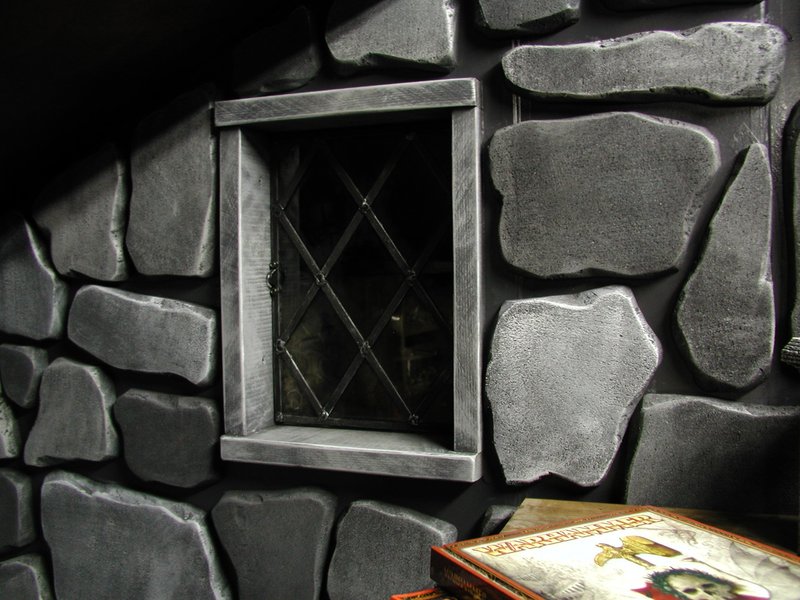
Room completed!! (June 2008)
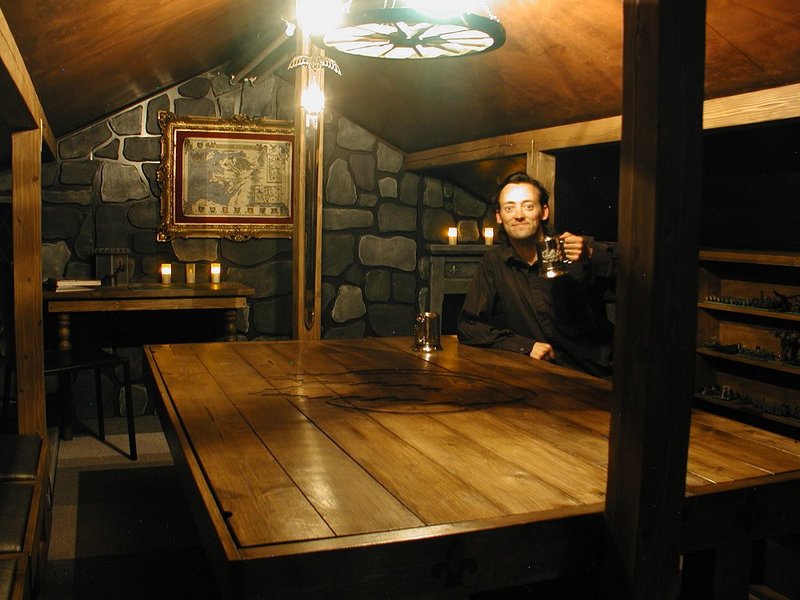
▲ Oh my goodness - it's finally done!! After 17 months and many, many hours of painstaking work, I finally finished the games room. The fireplace was a simple job of sticking scorched logs together with a hot-glue gun, and the 'leaded' window pane was a slightly more complicated balsa-wood structure glued to perspex, and scraped with silver onto black. It looks convincingly real, and even opens too when we need the extra ventilation!
So with those notes completed, I'll finish up this little construction journal, and leave you to enjoy the photos of the final version. See you!
Finished room pics:


25 Comments :
JeanLuc Hodgen 2009-08-28 (Sat) 14:10PM
 Holy crap man. that is some insane artwork. i hope to build a game room like that someday.. only with more space . looks awesome dude. enjoy it.

Terry Hunt 2009-09-23 (Sun) 13:23PM
Wow. I think that is all that can be said. That is amazing.
I would love to do something like this. What (if I can ask) do you think is the cost of the entire job?
Where are you located? I would love to see this in person!!!
Great Gaming is in your future I can tell.
David 2009-09-23 (Sun) 14:11PM
Thanks! I'm near Fukuoka city, southern Japan - but anyone passing through is always welcome!
I think that the wood materials for floor and wall supports came in at about 300 USD, and then another 300 to finish the floor in carpet and planking. The walls and ceilings were just polystrene, glue and paint on top of plasterboard, and were maybe 200 dollars (including the boards). After that it was just banging wood together for furniture - table was most costly, at about 100 dollars. Benches, bookcases, desk and fireplace were perhaps another 200. Then lots of paint and woodstain - another 100. What's that... 1200? Maybe closer to 1500, I guess. The cost was not too bar for what I got, but the time involved was considerable. But heck, what better way to spend an hour each night, yeah? (don't answer that)
Lord Ashram 2009-09-27 (Thu) 07:24PM
Just wanted to say how much I enjoy looking at your room; what a great, great job. If you ever can take more shots of the table with figures on it, that would be great...
Hope you don't mind, but I included it in a list of my favorite wargames rooms on my blog; please do come by and take a look!
Doc 2009-12-04 (Sat) 19:08PM
Hi David
I 'found' your site and blog on your amazing room through the Lord Ashram blog. I am hugely impressed by what you've achieved. It is my ambition to similarly transform my garage one day. I've sent your link to another gamer Robert, also based in Japan who runs the 'Serrez les Rangs' blog.
Congratulations again on your wonderful achievement with the creation of the 'Dungeon'.
Cheers,
Doc
David Rigney 2010-01-16 (Tue) 05:28AM
WOW. I am getting ready to come to Japan in a few weeks and I wanted to see what kind of clubs were around Nagoya when I saw your site. I have to say that I am impressed and jealous. Now I have to make one for my club here in Kentucky. You have done an awesome job, I am going to add a link on my site for everyone to check out your hard work. Great job and Good Gaming. Dave - SCALE-Scott County Adventurers League.
Colin Auschrat 2010-05-29 (Sat) 06:47AM
I am working on putting together a gaming room much like yours, smaller and simpler though. I was wondering what you used for the foam rocks on the walls? What type of foam and what did you use to affix them there?
I am also interested in your lighting. What are you using other than the chandelier to light the room?
David 2010-05-31 (Mon) 11:08AM
The stone walls are 1" thick blue insulation styrofoam (you can see them in the Nov 2007 pic), which I cut into random shapes using a breadknife. It's denser than white polystyrene, and is the stuff commonly used for gaming boards and terrain. I think it also comes in pink? You can cut it easily, and also sand it smooth(ish). It might be a little fragile for most rooms (bashing into it with furniture leaves a dent), but for this room it was ideal as the ceiling is too low to let people bump into the walls. They were simply given a quick spread of PVA glue on the back and pushed into place. The suction effect of the glue held them in place until dry.
I put in a double light switch for this room. One switch leads to the chandelier light in the centre of the room, which has 3 x 40W incandescent bulbs in it (you can see them in the pic). That light alone makes it a little dark for regular play - you'll end up stepping on stuff on the floor, but it's ideal for games set in ruins ...
Craig Lancaster Marr 2010-06-13 (Sun) 20:03PM
I love this room! It's superb. Really amazing. I plan something very similar but will make use of candles. Since I plan to use wall mounted candle sconces I am worried about the risk of a fire hazard if I use insulating foam.
Do you (or anyone reading this) have any suggestions to combat this?
Is there are hardier/less fragile alternative to insulating foam as my room is very much going to be a living room/lounge?
Excellent work, really inspirational!
David 2010-06-14 (Mon) 11:14AM
Candles... hmm, it could work. You could also try flickering LED wall lamps, but of course they are not generally very bright. Well, the insulating foam I used is actually fire-retardant (so it says), but a tougher alternative might be worth doing. You could try making (for example) 5 patterns of stone moulds (using DIY store garden paving or whatever) and repeating it with solid plaster copies, with or without foam cores to bulk it out and keep the weight down. Or you could plaster or texture-paint over foam chunks, but that would be a very messy job.
You could also simply get hold of some faux-stone wallpaper rolls, and stick those up. I've seen some very realistic, photo-quality ones. The main reasons I didn't do it in wallpaper (apart from the slightly greater cost) was because I wasn't in a hurry to finish, and I wanted deeper shadows and a gloomier atmosphere.
Tony N 2010-07-06 (Tue) 22:13PM
First of let me say this, this room is outstanding!!!!
I am about to get my own room for gaming in te house I am purchasing (basment room, 14ftx15&1/2ft) and had a similar idea for my room (though tossing around a 40k theme as well) and went searching on the net for ideas and stumbled on yours. Not one other comes close to this. I hope mine can turn out half as close to this.
Any way, I have a few questions. The table, do you have plans (or get plans) for the table? How functional is it? does the top sit on a lip or rest on the boards below? Any info on the table would be greatly appreciated as after i get my flooring done, that will be my next project.
Once again, SUPERB room!!! !!
David 2010-07-09 (Fri) 15:13PM
Ooh, a room with a proper height ceiling - I'm very jealous!
Haven't got the plans for the table any more, I'm afraid. I'll admit that it's not a hugely functional table, because it's limited by its fixed position and low height. To move the table from between the roof support pillars, I'd have to take it to pieces. However it's a good size and design for storing 2 inches of gaming board, and excellent for smaller games on top too, with space to put your beer. The edges of the table actually work like the 4 sides of a picture frame, into which you can slot your tabletop. They are there to provide a solid edge all the way around, and to stop the tabletop from slipping sideways - but not much else. They don't take any of the weight of the tabletop at all. The tabletop itself rests on 6 x small 2 inch blocks of wood; one in each corner and one halfways along each long side. These lift the tabletop above the boards when they are stored inside, or can be removed to drop the tabletop down into the empty space whe boards need to be placed on top. Hope that makes sense? If you want extra pics, drop me a line.
Regardless of whether you decide to build from scratch or not, I can REALLY recommend carving a design into the tabletop. It looks awesome, and only took an hour with a cheap router. Draw it on with a pencil, use the router to carve out the design to a constant depth, sand it, and then woodstain.
benvoliothefirst 2012-03-06 (Tue) 10:27AM
Yep, that's freakin' incredible. You takin' commissions? How much you want to come out to Sacramento and do mine for me? ;-)
Ralf Romano 2016-11-19 (Sat) 6:47AM
Do you have an email address...I would really like more info on the walls
David 2016-11-19 (Sat) 9:47AM
Sure, it's david@, followed by the site address! Or feel free to use the Contact page email form.
Kyle 2018-03-24 (Sat) 20:12PM
holy crap man. i found the website URL you gave me in my pocket after a night out. I wasn't expecting this. Amazing website, epic gaming room. It's a shame I'll be leaving this May.
David 2018-03-24 (Sat) 20:24PM
Pop over tmrw (Mar 25th) anyway? Beer and laughs etc...
Jerry 2018-07-11 (Wed) 11:06AM
Great room! It such a great way to spend your time and a great way to enjoy a great game too
Ross 2018-07-14 (Sat) 17:55PM
I love this room.
Just that.
And Thankyou for the many happy years of gaming you’ve provided.
We really should use this room more!
Zoltan 2018-10-20 (Sat) 4:04AM
Hi there. Massively amazing project! Love the dungeon room. Can you tell me, did you use Pine wood for the shelving, and what stain did you use?
David 2018-10-20 (Sat) 12:10PM
Hi Zoltan! Yes, the shelves were basically the cheapest pine two-by-fours I could find, with a few extra wide ones. I think the stain was walnut, might have been 2 coats. Very, very cheap!
Zoltan 2018-10-29 (Mon) 9:13AM
Excellent! I'm going to try to make almost the same shelving units, just like yours, because they look great. You don't have any plans for them, possibly?
David 2018-10-30 (Tue) 17:09PM
Haha - sorry, I think I plan to keep those shelves!
But seriously, try it... they're actually very easy and cheap to make yourself! Good luck!
Amanda 2021-08-27 (Fri) 5:57AM
I know this was posted years ago, but what was the base paint color called?
David 2021-11-25 (Thu) 12:44PM
Sorry Amanda, I don't remember the colour name!
Write a comment :
Random Images:


 初めての方はこちら


