Kumamoto Gamers
熊本のミニチュアゲーム会

Travel Warhammer : トラベル用のウォーハンマー
by David on 2013-12-09 (Mon) 12:43PMSo I'm taking an overseas trip soon, and I'm faced with LONG hours in a plane with little to do - really, no movies at all?!
Since Euan is quite happy playing full Warhammer games these days, I wondered if it would be possible to make a carry-around version of warhammer for us to play on the plane etc. It uses simple scaled-down magnetic cards instead of the normal cases of models, and is played on an A4 sized battlefield. I managed to get everything into a zip folder at about 300g, so the only thing extra you'll need are some army lists!
クリスマスに海外に行きますけど、安い飛行機の中にはすることはあまり無いですね。ところで、トラベル用のウォーハンマーを作ってみました。

Printable PDF File - 印刷用PDFファイル:
Thanks to this handy free BattleChronicler software I found online, I was able to create some very real looking maps and terrain counters. I've assembled everything in the PDF file (link below), so all you need to do is print the pages you need onto label/sticker paper.
Battlefield & Terrain PDF file >>
印刷できるPDFファイル >>
(12MB)
You will need - ショッピングリスト:

- 2mm acrylic sheet アクリル板 (200mm x 300mm) ..... 347yen
- 0.1mm steel sheet ステン板 (200mm x 300mm) ..... 340yen
- Two A4 magnet sheets マグネットシートを2枚 ..... 640yen x 2
- A4 label/sticker paper プリンター用ラベルシート ..... 780yen for 20
- Roll of adhesive clear sheet カバーフィルム ..... 780yen
- Whiteboard pen ボード用マーカーペン ..... 120yen
- Three sealable bags ファスナー付きバック3枚 ..... 105yen
I also recommend a padded dice box - ダイスボックスもおすすめします:
- Small plastic box with latch プラスチック箱 ..... 100yen
- Felt sticker sheet 貼れるフェルト ..... 210yen
Dice box - ダイスボックス:
Rather a no-brainer, this... I cut some felt sticker sheet to fit inside a small paper-clip plastic box. This would make a handy storage case for the 10 dice (and artillery/scatter dice), and would also muffle the sound of dice rolling so as not to annoy other bored passengers!
やはりダイスはうるさいよね!静かにゲームできるようにフェルトシールを箱に貼りました。

Game board - ゲームボード:
I printed two battlefields (for variation) onto A4 sticker sheets and stuck one on to each steel sheet. There are 3 versions in the PDF, so choose whatever you like - roads, valley or blank. Then I simply cut off the unwanted edges of paper, and stuck the metal sheets to each side of the acrylic sheet using double sided tape. To finish the board I covered both sides with clear tape sheet, so it would be protected from dirt and also smooth the sharp metal edges.
PDFから好きなボードをラベルシートで印刷します。そのボードのシートをステン板に貼ります。それからステン板を両面テープでアクリル板に貼ります。最後に、ボードをカバーフィルムにラッピングしました。バリエーションのために、私は両面に2デザインも貼りました。

Terrain Counters - テレイン:
Next job was to print out the terrain counter page, again onto A4 sticker sheet, and stick that onto one of the magnet sheets. Then I simply cut around each terrain feature, leaving a couple of millimeters around building, walls etc. Bit tedious, this bit!
テレインのページをラベルシートに印刷します。そのシートをマグネットシートに貼って、ナイフでカットしました。

Unit cards - ユニットカウンター:
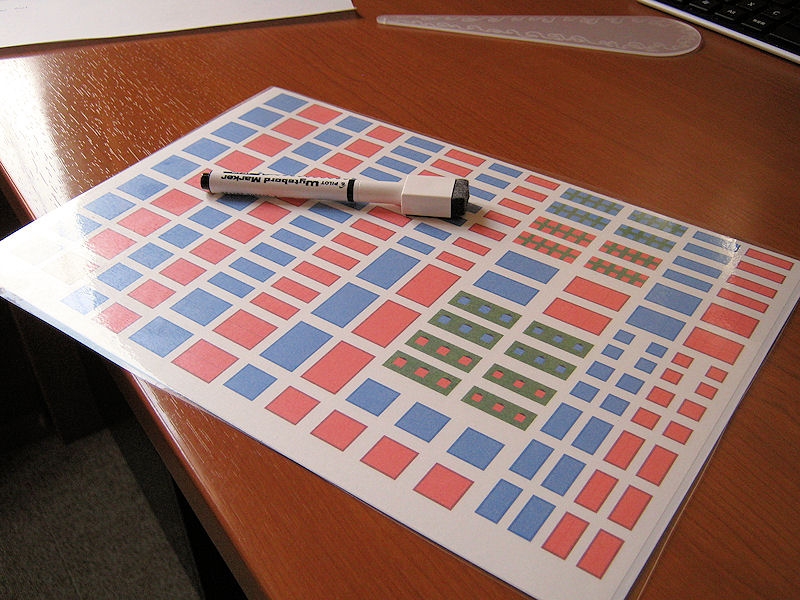
With the board and terrain finished, it was time to work out the scales for the most commonly-used unit sizes, and make a page of those. Thankfully, you can just print the PDF page - lucky you. Print onto another sticker sheet, and stick that (like the terrain) onto a second magnetic sheet.
Before you cut them out, however, you will need to cover the whole sheet with clear tape sheet. This is very important, as it allows you to write on the unit name and number of models with the whiteboard marker, and then edit numbers during the game as you take casualties.
次はユニットカウンターの作成です。下のPDFページをラベルシートに印刷して、マグネットシートに貼ります。そのあと、カバーフィルムも貼ります。各ゲームには、ユニット名やモデル数もボードマーカーで書くことができますので、結構便利です。

I tried these unit cards in a 1600 pt game, and they worked fine. You can mark heroes, battle standard bearers, etc. on each unit card.

Ruler and templates - メジャーとテンプレート:
The last thing to do is print out the scaled-down ruler and templates onto a final sheet of sticker paper, and stick it on some thick card. With a cutter you can carefully remove the template shapes from the card (see the white template card, bottom right), which gives you a very accurate template. I went one step further and printed the rulers onto clear film sticker sheet, and stuck that to some 0.2mm clear plastic sheet. I also recommend punching a hole through the end of the ruler and template card, and linking them together - much harder to misplace in the heat of battle!
最後のステップはメジャーとテンプレート作りです。PDFのページをラベルシートに印刷して、厚いカードに貼ります。テンプレートの形をカッターで抜きます。はい、出来上がりです。

PS. I recommend noting down the miscast table results on the back of the template card, for mid-game reference!


 どんだけウォーハンマー好きなんですか


 初めての方はこちら


